
Landing in a crosswind is one of the most hands-on, rewarding skills you'll develop as a pilot. It's a true test of stick-and-rudder proficiency. At its core, it's about using coordinated rudder and aileron inputs to keep the airplane tracking straight down the runway centerline, even when the wind is trying its best to push you off course.
There are two classic ways to do this: the crab technique and the wing-low (or sideslip) technique. Think of them as two different tools for the same job. A truly skilled pilot knows when to use each one—and often, a combination of both—to nail a smooth, safe touchdown every time.

Why Nailing Crosswind Landings Is a Defining Pilot Skill
Whether you're a fresh student pilot or have thousands of hours in your logbook, handling a stiff crosswind is what separates the pros from the amateurs. It’s far more than just another maneuver to check off a list; it’s a pure demonstration of airmanship. This is where theory meets reality, demanding quick thinking, fine motor skills, and solid judgment right down to the runway.
The stakes are high. The data paints a clear picture: adverse wind is a factor in a staggering 33% of all approach-and-landing accidents. When you combine gusty crosswinds with runway conditions, that figure jumps even higher, contributing to nearly 70% of runway excursions. You can dig deeper into these numbers with SKYbrary's extensive research on landing accidents. This isn't just about pride; it's a fundamental part of flying safely.
The Two Foundational Methods for Staying in Control
To keep the wind from winning, we rely on two primary methods. Each has the same goal—to counteract drift and keep you aligned with the centerline—but they achieve it in different ways.
Before we dive deep into the "how-to" for each method, let's get a high-level view of what makes them different.
Core Crosswind Landing Techniques at a Glance
| Technique | Core Concept | Primary Use Case |
|---|---|---|
| Crab Method | Point the nose into the wind to counteract drift, maintaining a straight ground track. | Most of the final approach, especially in stronger winds or for larger, faster aircraft. |
| Wing-Low Method | Lower the upwind wing and use opposite rudder to stay aligned with the runway. | The final moments of the approach, through the flare and touchdown. |
Understanding both is key, as you'll often blend them for the perfect landing.
A Skill You Can't Afford to Get Rusty On
Unlike, say, a steep turn, which you might only do on a flight review, crosswinds are an everyday reality. It doesn’t matter if you're flying a classic Cessna, a speedy Mooney, or even a helicopter; if you fly, you will face crosswinds. Getting it wrong isn't just embarrassing—it's dangerous.
A poorly executed crosswind landing can impose huge side-loads on the landing gear, send you skidding off the runway, or even cause you to lose control entirely.
Mastering crosswinds is the mark of a disciplined pilot. It proves you can adapt to a dynamic environment and stay in full command during the most critical phase of flight.
This guide will walk you through the theory and practical application of these techniques. The goal is to help you face windy days not with anxiety, but with the confidence that comes from genuine skill.
Decoding Wind and Your Aircraft's Limits
Before you ever line up with the runway, the real work of a crosswind landing has already begun. It starts on the ground, with a good look at the weather and an honest assessment of both your plane's capabilities and your own. A successful landing isn't just about technique; it's about making smart go/no-go decisions long before you’re in the air.

First things first, you need to figure out your actual crosswind component. That number ATIS gives you is the total wind speed, but what really matters is how much of that wind is pushing you sideways. You can always pull out a crosswind chart, but for a quick calculation in the cockpit, nothing beats the "Clock Method."
The Clock Method for Quick Mental Math
Think of a clock face. The runway is pointing straight up to 12. The angle between the wind direction and the runway heading corresponds to the minute hand.
- 30° Difference: The wind is coming from your 1 o'clock or 2 o'clock position. That's 30 minutes past the hour. Your crosswind component is about 50% of the total wind speed.
- 45° Difference: A 45-degree angle is like 45 minutes past. Plan for the crosswind component to be roughly 75% of the total wind.
- 60° or More: If the wind is 60 degrees or more off the nose, just treat it as a direct crosswind. The component is effectively 100% of the reported wind speed.
So, if ATIS calls the winds at 20 knots from a 30-degree angle, you’re dealing with a 10-knot crosswind. Simple as that. This quick mental check turns a vague weather report into a solid number you can use for your go/no-go decision. It's a key part of the solid planning we discuss in our guide on pre-flight checks for a Cessna 172.
POH Limits Are Not Suggestions
Once you have that number, you need to open up your Pilot’s Operating Handbook (POH) and find the demonstrated crosswind velocity. Let me be clear: this isn't a suggestion. It's a hard limit. That number was achieved by a top-tier test pilot in a brand-new airplane under perfect conditions. For the rest of us, it’s a line in the sand you should never plan to cross.
Your personal limit should always be lower than the POH's demonstrated limit. If the book says 15 knots and you haven't flown in gusty conditions for a few months, maybe your limit for the day is 10 knots. There's no shame in that—it's smart flying.
This conservative mindset is your best defense because wind is rarely a steady, predictable force. It gusts. A sudden gust can spike the crosswind component, instantly throwing you into a situation that's beyond the airplane's—or your—ability to handle.
A NASA study on wind-related incidents drives this point home. A Boeing 737, with a regulatory crosswind limit of 33 knots, was involved in an accident where a peak gust hit 45 knots. That’s a 36% exceedance over the demonstrated limit. The data makes it painfully clear how a manageable crosswind can become an emergency in a split second.
So, always plan for the gusts. If the forecast is 15 knots gusting to 25, your number for the day is 25, not 15. This is the bedrock of good airmanship and the foundation for every single crosswind landing you’ll ever make.
Executing a Stabilized Approach with the Crab Method
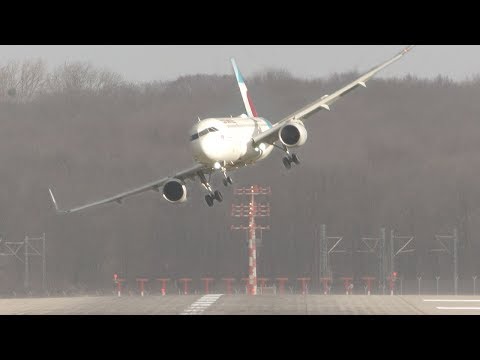
The crab method is your go-to technique for nailing a stabilized approach when the wind is trying to push you around. The concept is beautifully simple: you point the airplane's nose into the wind just enough to stop it from drifting off the centerline. Your ground track stays perfectly aligned with the runway, even though your nose is pointing somewhere else.
Think of it like paddling a canoe across a fast-moving river. You have to point the bow upstream to avoid getting swept downstream. It's the same principle in the air. This technique works brilliantly on final approach, letting you focus on the big three: a consistent airspeed, a steady descent rate, and your landing configuration. From the cockpit, the runway will look a little off to the side. Don't worry, that's exactly what you want to see.
Establishing the Perfect Crab Angle
Finding the right crab angle is less about math and more about feel. It's an art form guided by constant, small adjustments. You aren't just going to dial in a heading and sit back; you’ll be actively flying the airplane all the way down.
Start by turning the nose into the wind and see what happens. Are you still drifting away from the runway? Add a little more crab. Did you go too far and now you're tracking upwind of the centerline? Take some of that angle out. The goal is to find that sweet spot where your aircraft is drawing a perfect line to the threshold, even with the nose cocked into the wind. Your PAPI or VASI will keep you honest on the glideslope, and the runway itself is your guide for staying centered.
Key Insight: The amount of crab you need isn't a "set it and forget it" affair. Wind shifts as you get lower. You have to stay on your toes, continuously tweaking that angle to keep the airplane locked onto the centerline.
This constant back-and-forth actually makes you a better pilot. It forces you to keep your scan moving, checking your aim point on the ground against your instruments to ensure you’re truly stable. A stable approach is the key to a great landing, and crabbing is what makes it possible in a crosswind.
The Critical "Kick-Out" and Transition to Flare
Here’s where precision and timing become everything. You've flown a beautiful, stabilized approach, tracking the centerline perfectly with your nose pointed into the wind. Now for the tricky part: you can't actually land like that. Touching down sideways puts a massive strain on the landing gear—a side load—and is a classic recipe for losing control.
Just before you start the flare, only a few feet off the deck, you have to perform the "kick-out." This is a coordinated, almost simultaneous, two-step dance:
- Apply Rudder: Use the rudder to swing the nose straight, aligning the airplane’s body with the runway. If the wind is from your left, you'll need right rudder.
- Apply Aileron: As you push that rudder, the upwind wing is going to want to lift. You have to stop it by applying aileron into the wind (e.g., left aileron for a left crosswind) to hold the wings level.
This transition from a crab to a straight-ahead slip has to be a smooth, deliberate move. It all happens in the final seconds before touchdown. Your view out the window snaps from crooked to straight, and you immediately begin the flare, ready to land.
Timing is Everything
The single most common mistake I see pilots make with the crab method is messing up the timing of the kick-out.
- Too Early: Kick the nose straight when you're still too high, and the wind will immediately start blowing you sideways across the runway. You’ll spend the most critical part of the landing—the flare—fighting just to get back over the pavement.
- Too Late: Wait too long, and you’ll touch down while still sideways. This can cause you to skip, swerve violently, or even damage the gear.
Mastering this timing simply takes practice. You're aiming for one fluid motion: rudder aligns the nose, aileron holds the wings level, and back pressure starts the flare for a gentle touchdown on the upwind wheel first. For pilots wanting to really hammer this down, nothing beats repetition. You can explore how flight simulators help build this muscle memory in a safe, controlled setting. Perfecting these techniques is what turns a scary crosswind into just another day at the office.
Fine-Tuning the Touchdown: The Wing-Low Sideslip
While crabbing gets you lined up on final, the wing-low sideslip is what separates a good landing from a great one. This is the technique that gives you pinpoint control in those critical last few moments, keeping the airplane’s nose pointed straight down the runway centerline all the way through the flare and rollout. It's a bit of a dance, requiring you to use aileron and rudder in opposition.
The whole point is to stop any sideways drift by banking the airplane into the wind. So, if the crosswind is coming from your left, you’ll apply a little left aileron to lower the left wing. Of course, banking left makes the airplane want to turn left. To stop that from happening, you simultaneously apply just enough opposite rudder—right rudder in this case—to keep the nose tracking perfectly straight down the runway.
This diagram breaks down the basic sequence, from crabbing on approach to the final touchdown.

Notice how it flows from the initial crab to the crucial "kick-out" just before touchdown. That smooth transition is what we're aiming for.
Getting the Sight Picture and Feel Just Right
The beauty of the wing-low method is that the view out the window is exactly what you’d expect: you're looking straight down the runway, right where you want to end up. You'll see one wing dipped lower than the other, and that's your confirmation that you're actively correcting for drift. The stronger the crosswind, the more you'll need to lower that upwind wing.
More bank always means you'll need more opposite rudder to keep the nose straight. You'll feel this right away in the controls. It's a constant, active process of adjusting pressure on both the aileron and rudder to hold that perfect alignment, especially as the wind changes near the ground.
A CFI's Tip: Think of it this way: ailerons control your sideways position over the runway, and the rudder points the nose. Ailerons for drift, rudder for alignment. Mentally separating the two jobs makes it much easier to coordinate the inputs.
Most experienced pilots don't hold a sideslip all the way down final. Instead, they use a hybrid approach that works brilliantly, especially in gusty conditions. They'll hold a stable crab on final and then transition into the wing-low sideslip right before the flare, typically in the last 50 feet or so.
The Transition: From Crab to Sideslip
This hybrid technique really gives you the best of both worlds. You get the stability of the crab during most of the approach, then the precision of the sideslip right when you need it most—for the touchdown itself. The transition is everything.
As you get ready to flare, you'll smoothly "kick out" the crab with the rudder to align the nose with the centerline. At the same time, instead of just leveling the wings, you continue rolling into a bank to lower the upwind wing. It’s one fluid, coordinated motion: rudder straightens the nose, and aileron sets up the sideslip.
- When to start? Aim to begin the transition just as you're about to flare. If you do it too early, you'll start drifting off the centerline. Too late, and you risk touching down while still in a crab.
- How much control? The inputs should be smooth but deliberate. As you feed in rudder to point the nose straight, you'll be feeding in aileron to bank into the wind.
This maneuver takes practice, but mastering it is what leads to those professional, greased-on crosswind landings. It gives you the authority you need to handle gusts and track the centerline like you're on rails.
The Perfect Touchdown
Once you have the sideslip established, you just continue the flare while holding that wing-low attitude. A textbook crosswind touchdown always follows a specific sequence.
- Upwind Main Wheel Touches First. Because that wing is lower, the main wheel on the upwind side will touch down first. This is exactly what should happen.
- Downwind Main Wheel Follows. As the airplane settles, the other main wheel will touch down next.
- Nose Wheel Is Last. Only after both main wheels are firmly on the ground do you gently lower the nose wheel to the runway.
As you slow down on the runway, your flight controls get less effective. You'll need to keep adding more and more aileron into the wind to keep that upwind wing from being lifted by a gust. This ensures you stay stable and track straight, finishing off a perfectly executed crosswind landing.
Making the Critical Go–Around Decision
 Watch Video
Landing in a crosswind is one of the most hands-on, rewarding skills you'll develop as a pilot. It's a true test of stick-and-rudder proficiency. At its core, it's about using coordinated rudder...
Open the dedicated video pageThe most important technique for any crosswind landing is knowing when not to land. A go-around isn't an admission of failure. It's the mark of a sharp, disciplined pilot who puts safety ahead of ego.
It’s a tough spot to be in. The runway is rushing up to meet you, and the temptation to "salvage" a shaky approach is powerful. But learning to spot the warning signs early and making the call to go around is one of the most critical skills you can master.
Every pilot should have a firm idea of what a stable, acceptable approach looks like. The second your crosswind approach falls outside those personal minimums, the decision should be automatic. This is no time for wishful thinking.
Clear Triggers for a Go-Around
An unstable approach is the classic setup for a go-around. If you find yourself wrestling the controls, making large, aggressive inputs just to stay somewhere near the centerline, you’re not really flying the airplane anymore. The wind is.
Keep an eye out for these objective red flags. If you see them, it's time to abort the landing:
- Excessive Drift: You're doing everything right with your crab or slip, but the wind is still shoving you off the centerline. If a safe touchdown within the touchdown zone looks unlikely, go around.
- Running Out of Rudder: This is a big one. You've got the rudder pedal pushed to the floor, but the nose just won't stay aligned with the runway. You have zero control authority left to fight the weathervaning tendency.
- Unstable Airspeed or Descent Rate: You’re chasing the needles. If gusts and turbulence have your airspeed or VSI bouncing all over the place, the approach is fundamentally unstable.
- That Gut Feeling: Sometimes, it just doesn't feel right. Trust that instinct. That little voice is your training and experience screaming that the situation is getting dangerous.
A go-around is always the cheaper option. A little extra fuel and another five minutes in the pattern are nothing compared to the cost of a bent airplane or, worse, an accident. It's a routine maneuver, not an emergency.
This isn't just theory. According to landing insights from AOPA, wind-related incidents are a persistent problem. In a single year, 121 of 413 landing accidents were directly tied to wind, highlighting a widespread reluctance to abort a landing when conditions demand it.
The "Get-Home-Itis" Trap
One of the most insidious psychological traps in aviation is "get-home-itis." It's that powerful, internal pressure to get on the ground now, at your destination, no matter what. You're tired, you're behind schedule, or you just want the flight to be over.
This mindset is a recipe for disaster. It convinces pilots to accept bigger risks and push well past their own capabilities and the aircraft's limits.
When the crosswind is howling and you're on your third ugly approach, the truly professional move might be to divert. Find a nearby airport with a runway pointed more favorably into the wind. Making that call demonstrates true airmanship, a skill we practice and refresh during proficiency training. You can learn more about what's covered by checking out the biennial flight review requirements.
Ultimately, a go-around gives you time and space. You can climb back to a safe altitude, take a breath, rethink the wind, and either set up for another, more stable attempt or make the smart call to divert. The runway isn't going anywhere. Your chance to make a safe decision, however, is gone in an instant.
Answering Your Crosswind Questions
Even after you’ve got the theory down, some very practical questions always come up when pilots talk about crosswinds. Let's tackle some of the most common ones I hear on the flight line.
What's the Biggest Mistake Pilots Make?
Hands down, the single biggest mistake is thinking the landing is over once the wheels touch down. It’s not. Pilots often relax their grip on the controls right at touchdown, which is the worst possible moment. A sudden gust can get under the upwind wing, lift it, and send you skipping or veering off the runway before you can react.
As your aircraft slows down on the ground, the controls get mushy and less effective. That means you actually have to continuously increase your aileron deflection into the wind to keep that wing planted. You are actively flying the airplane until you’re at a safe taxi speed and turning off the runway.
Key Takeaway: The landing isn't finished at touchdown. It’s finished when you're safely parked. You must maintain positive control through the entire rollout. No exceptions.
Is It Better to Crab or Use the Wing-Low Method?
This is the classic debate, and the real answer is that you need both. A smart pilot uses a combination of the two because each technique is perfect for a different part of the approach.
- Crab Method: This is your best friend on final approach. It keeps the wings level, which makes for a much smoother ride for you and your passengers, while neatly canceling out any drift. You can just focus on your descent path.
- Wing-Low (Sideslip) Method: This is what you need for the flare and the actual touchdown. By putting a wing down into the wind, you align the airplane's body with the runway. This is crucial for preventing dangerous side-loads on your landing gear.
So, how do you put it all together? Most experienced pilots fly a crab down final and then, just as they begin the flare, smoothly transition to a wing-low sideslip for the touchdown. This hybrid approach gives you the stability of the crab for most of the approach and the precise alignment of the slip when it counts the most.
How Do I Know if the Crosswind Is Too Strong for Me?
This is where good airmanship and honest self-assessment are critical. The answer depends on the plane's limits, the day's conditions, and your own recent experience. First off, you never exceed the demonstrated crosswind component published in your aircraft's Pilot Operating Handbook (POH). That's a hard line.
But your personal minimums should almost always be lower than the book value. Ask yourself a few tough questions:
- When was the last time I really practiced crosswind landings? If it's been a few months, your personal limit today should be way lower than what you might have handled when you were sharper.
- How gusty is it? A steady 15-knot crosswind is a completely different animal than a 10-knot wind gusting to 20. Always make your decision based on the gusts, not just the average wind speed.
- What’s my gut telling me? If you're feeling a lot of anxiety just thinking about the landing, that's your brain telling you that you might be pushing your comfort zone too far.
Making the smart call to go-around or divert to another airport isn't a failure—it's the mark of a truly professional pilot. There's no shame in finding a runway pointed more favorably into the wind.
How Can I Safely Inspect a Used Airplane for Crosswind-Related Damage?
When you’re looking to buy a plane—especially a trainer that’s seen countless student landings—you absolutely have to check for signs of a hard life fighting crosswinds. Repeated side-loaded landings put a lot of stress on an airframe, and the damage isn't always obvious.
You have to look past the shiny paint. Get your A&P mechanic to focus on these spots during the pre-buy inspection:
- Landing Gear Attach Points: Look for any ripples or wrinkles in the aluminum skin where the gear meets the fuselage or wings. Popped rivets or small cracks are huge red flags for excessive side-loading.
- Tires and Wheels: Check for uneven or "scalloped" tire wear. This often points to alignment problems caused by being slammed onto the runway sideways over and over.
- Wing Tips and Fairings: On low-wing aircraft, get down low and look closely at the wingtips. Scrapes, patches, or repairs here could be evidence of a wingtip strike during a botched landing.
- Logbooks: Go through the maintenance logs with a fine-tooth comb. Look for entries about landing gear repairs, wheel alignments, or any "hard landing" inspections.
Buying an airplane safely means trusting your mechanic to find the subtle clues that tell the real story of an aircraft's history.
Can I Practice Crosswind Techniques Effectively in a Simulator?
Absolutely. While a simulator can't give you the true "seat-of-the-pants" feel of wind, it's an incredibly powerful tool for building the procedural muscle memory you need. A good sim lets you practice the control inputs and sight picture again and again in a completely safe setting.
You can dial in any scenario you want—a steady 15-knot wind, a nasty 10 gusting 25, a wind right at your personal limit—and fly the approach a dozen times in an hour. It’s especially great for nailing the timing of the transition from a crab to a sideslip. Practice that sequence until it’s automatic in the sim, and you’ll be far more confident and capable when you face it in the real aircraft.
Mastering crosswinds is a journey, not a destination. It takes continuous practice and a healthy dose of sound judgment. At DuBois Aviation, our experienced instructors are focused on building real-world skills that make our students safe, confident pilots. Whether you need to rent an aircraft, earn a new rating, or just brush up on your skills, we've got the team and the fleet to help you reach your goals.
Explore our flight training programs to learn more.


