
You're probably holding a clipboard, looking at a fuel receipt, and trying to remember whether the baggage area arm came from the POH or the school sheet. That's a normal place to be. Most students don't struggle because weight and balance is too advanced. They struggle because the form looks like accounting, while the airplane feels like flying.
The problem is that the math and the flying are inseparable. A weight and balance form tells you whether the airplane will rotate, climb, flare, and stall the way you expect. If you're flying a training Cessna or Piper for your first solo, that form isn't paperwork you complete to satisfy an instructor. It's your proof that the airplane you're about to command is loaded in a controllable, legal way.
For a plain-language walkthrough of the bigger picture, it also helps to review a practical aircraft weight and balance overview alongside your own POH and dispatch paperwork. Then come back to the form in front of you and work one line at a time.
Why Weight and Balance Is Your Most Important Preflight Task
You untie a Piper Cherokee on the ramp. The weather is good, your route is short, and the airplane looks fine. A lot of students feel ready to move straight to fuel, oil, and walkaround. The weight and balance form can feel like the slow part standing between you and engine start.
That instinct is backwards.

A bad loading decision changes how the airplane flies before the wheels ever move. If the center of gravity is too far forward, the airplane may feel nose-heavy and harder to flare. If it's too far aft, the airplane may feel lighter in pitch but less stable, and stalls can become more dangerous to recover from. That's why this isn't just “do the math because the FAA says so.” It's a direct control-and-safety issue.
What the form is really proving
The form answers two questions:
- Is the airplane too heavy
- Is the weight positioned safely
Those are different problems. An airplane can be under max weight and still be unsafe because the CG is outside limits. It can also be within CG limits and still be unsafe because total weight is too high.
Practical rule: If you can't prove the loading is inside the approved limits, you don't know the airplane you're about to fly.
FAA guidance requires current weight and balance data to be carried on board, including the Basic Empty Weight, Basic Empty Weight Moment, and the approved CG envelope chart, and if your calculated weight and CG don't fall within that envelope, the aircraft is legally and physically unsafe to fly according to FAA weight and balance guidance summarized here.
Why students should care before first solo
On a first solo, there's no instructor in the right seat smoothing out a bad loading decision. If the trim feels odd, the takeoff roll feels long, or the flare takes more force than expected, you own that.
That's why experienced instructors treat the weight and balance form as a command decision. Before every departure, you're not filling boxes. You're verifying that the airplane will behave like the one you trained in, not like a surprise version of it.
Decoding the Numbers on Your POH and Form
Most confusion starts with the vocabulary. Students look at the POH, see words like datum, arm, moment, and envelope, and freeze. The good news is that these aren't mysterious terms. They're just a precise way to describe where weight sits in the airplane.

The core terms in plain English
Here's how I explain the common entries on a weight and balance form to a new pilot flying a Cessna 150.
- Datum. This is the airplane's reference point. Every arm is measured from it.
- Arm. This is the distance from the datum to the item you're loading.
- Weight. That's the load at that station.
- Moment. This is the turning effect that weight creates at a given distance from the datum.
- Center of Gravity. This is the aircraft's balance point after all the moments are combined.
- Basic Empty Weight. This is the airplane in its approved empty state, based on its records.
- CG envelope. This is the approved area on the chart where your loaded aircraft must fall.
If you want a mental picture, think of a seesaw. Weight alone doesn't tell you much. A small weight far from the pivot can matter as much as a larger weight close to it. That's why the form tracks both pounds and inches.
Why negative arms confuse so many students
Negative arms are one of the most common stumbling blocks. A student sees a minus sign and assumes something is wrong with the data entry. Usually it just means the item sits forward of the datum.
An engine is a common example. If the manufacturer chose a datum behind the engine, the engine's arm may be negative because it's located forward of that reference point. The number isn't bad. It's descriptive.
Pilots often misunderstand that negative arms, common for items forward of the datum like an engine, can lead to front-heavy CG conditions and nose-down pitch tendencies during takeoff. Emerging 2025 FAA safety reports highlighted a 23% increase in student pilot CG errors linked to misinterpreting negative arms, as discussed in this Boldmethod explanation of arms and weight and balance.
A minus sign doesn't mean “ignore this.” It means “this weight pulls the balance point forward.”
What students usually mix up on the form
The most common mix-ups aren't advanced aerodynamics. They're basic label errors.
| Term | What it means on the form | Where students get tripped up |
|---|---|---|
| Datum | Reference line for all measurements | Treating it like a physical station you can always see |
| Arm | Distance from datum to station | Copying the wrong station value from the POH |
| Moment | Weight multiplied by arm | Forgetting the units and just adding weights |
| CG | Total moment divided by total weight | Thinking this alone makes the airplane legal |
| Envelope | Approved operating area on chart | Skipping the plot after finishing the math |
When you read your POH this way, the form stops looking like a spreadsheet and starts looking like a map of how the airplane is balanced.
A Step-by-Step Calculation for a Piper Cherokee
The form becomes useful. The foundational formula for all aircraft weight and balance calculations is Weight × Arm = Moment, and you find the CG by dividing total moment by total weight, as explained in the EAA weight and balance guide. If the math is wrong, the airplane can end up outside its approved envelope.
I teach students to do this in the same order every time. Use the aircraft's actual paperwork first, then the POH station arms, then your current loading. Don't start by guessing whether it “looks fine.”
The sequence that keeps you organized
Use this flow for a Cherokee:
- Pull the aircraft's Basic Empty Weight and empty moment from the current records.
- Add pilot and passenger weights.
- Add baggage, if any.
- Add usable fuel.
- Compute each line's moment.
- Add all weights.
- Add all moments.
- Divide total moment by total weight to get the loaded CG.
- Plot that point on the approved chart.
If you're training in a different aircraft later, such as a 172, it helps to compare your process with a real Cessna 172 N weight and balance sheet so you can see how station layouts change from one model to another.
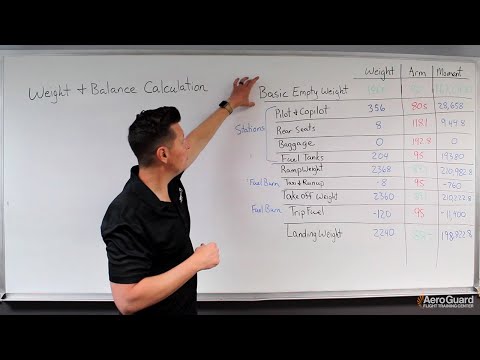
A simple worked example
Use the actual numbers from your airplane's records and POH when you fly. The table below is a teaching example that shows the structure of the calculation.
Sample Weight & Balance Calculation: Piper Cherokee
| Item | Weight (lbs) | Arm (in) | Moment (lb-in) |
|---|---|---|---|
| Basic Empty Weight | [from aircraft records] | [from records/POH] | weight × arm |
| Pilot | [actual weight] | [front seat arm] | weight × arm |
| Passenger | [actual weight] | [front or rear seat arm] | weight × arm |
| Baggage | [actual weight] | [baggage arm] | weight × arm |
| Fuel | [fuel weight] | [fuel arm] | weight × arm |
| Total | sum of weights | sum of moments |
Notice what matters here. Every row ties a weight to a location. That location is why two identical bags can affect the airplane differently depending on where you place them.
How to work each line without getting lost
Students often rush to the final CG and make mistakes in the middle. Slow down and ask one question per row: What is the weight, and where is it located?
For example:
- The pilot has a weight.
- The pilot seat has an arm.
- Multiply them.
- Write the result in the moment column.
Repeat that exact logic for fuel, baggage, and each occupant. Once all rows are complete, add the weight column and the moment column separately.
If one line is wrong, the total can still look neat and be unsafe.
Then do the final step:
CG = Total Moment ÷ Total Weight
That gives you the aircraft's loaded center of gravity in inches from the datum. At that point, you're not done. You've only earned the right to check the chart.
What matters most in the cockpit
The reason I teach this carefully in a Piper is that the airplane gives you feedback. A forward-loaded Cherokee can feel stubborn in rotation and flare. An aft-loaded one may feel more sensitive in pitch. The form is your chance to catch that on paper before you feel it in the air.
Plotting Your CG and Staying Within the Envelope
A lot of students relax after they finish the arithmetic. That's too early. The entire weight and balance process culminates in checking whether your calculated CG and gross weight fall within the POH's CG limits chart, and this published limitation structure is tied to 14 CFR § 23.2620, as described in AOPA's weight and balance discussion.
The chart is where math turns into a legal go or no-go decision.
How to plot the point
Take your two final values:
- Total weight
- Calculated CG
Find total weight on the vertical axis. Find CG on the horizontal axis. Then mark the point where those values intersect.
If that point sits inside the approved envelope, the loading is acceptable for that condition. If it falls outside, the airplane isn't safe to dispatch in that loading configuration.
What the envelope is protecting you from
The chart isn't arbitrary. It reflects handling and performance boundaries.
A forward CG can make the airplane harder to rotate and harder to flare. You may need more control force, especially during landing. A student usually notices that as “it feels heavy in pitch.”
An aft CG can reduce stability. The airplane may feel easier to pitch, but that doesn't make it better. It can make stall behavior less forgiving and recovery more difficult.
The envelope is the airplane's approved handling box. Outside that box, you're asking it to behave in ways the manufacturer didn't approve.
A good habit that prevents bad launches
When you plot the point, don't just check whether it barely sneaks inside. Look at where it sits. Is it comfortably within the normal operating area, or are you hugging an edge because of baggage or fuel choices?
That habit matters in training aircraft. A Cessna carrying two people, some bags, and a changing fuel load won't have the same margin as the same airplane on a local lesson with light loading. Plotting lets you see that difference immediately, which is exactly why the form exists.
Fixing Common Errors and Calculating Landing CG
Most weight and balance mistakes aren't caused by ignorance. They're caused by rushing. A student copies one arm from the wrong row, forgets a bag in the back, or does perfect takeoff math and never asks what the airplane will weigh at landing.
That last mistake matters more than many pilots realize. A critical but often-missed step is calculating the landing CG. Most tutorials stop at takeoff even though fuel burn changes the aircraft's weight and can shift CG, and this has become more important with the 2025 move toward scenario-based checkrides requiring dynamic weight and balance adjustments, as noted in this training-focused video discussion.

The mistakes I see most often
These show up again and again in student work:
- Arithmetic slips. A clean-looking form can still hide one bad multiplication or addition.
- Wrong arm values. Students sometimes use a front seat arm for a rear seat occupant, or pull a number from the wrong aircraft model.
- Outdated records. If the airplane has changed, the empty-weight data must match the current records.
- Tare weight mistakes. During aircraft weighing, chocks or devices on the scales must be accounted for rather than treated as airplane weight.
- Takeoff-only thinking. A legal departure doesn't guarantee a legal landing condition.
A better way to catch errors
Use a short challenge routine before you sign off the form:
- Recalculate one row from scratch.
- Re-add the total moment separately.
- Ask whether each loaded item is on board.
- Confirm that the empty-weight data is the current one for that aircraft.
- Check the landing condition, not just departure.
If you're also evaluating runway performance for that same loading and weather situation, pair the form with a landing distance calculation reference so your loading decision and performance decision stay connected.
The weight shift shortcut
Sometimes you don't need to rebuild the entire form. If you move weight within the airplane without adding or removing any, the weight shift formula helps:
ΔCG = (Weight Shifted × Distance Shifted) / Total Weight
The authorized example given in FAA-based training material shows that moving 40 lbs. aft by 30 inches in a 2,000 lb. aircraft changes CG by 0.60 inches aft, as explained in this Pilot Institute weight and balance lesson.
That's useful when you move baggage or reseat a passenger. But don't stop with the shortcut. After using it, recheck the new CG against the envelope.
How to calculate landing CG
Here's the practical method I teach.
Start with your takeoff form
Use the completed takeoff weight and total moment as your baseline.
Remove the burned fuel
Estimate the fuel that will be gone by landing. Subtract that fuel weight from your total weight. Then subtract the fuel's associated moment from total moment using the fuel arm for that aircraft.
Recompute the CG
Divide the new total moment by the new total weight. That gives you the landing CG.
Plot it too
Students often skip this final check. Don't. The takeoff point and the landing point can both be legal, or one can be legal while the other is not. Fuel burn changes the answer.
A weight and balance form stops being a ground-school exercise and becomes real pilot judgment.
Weight and Balance Records for Aircraft Buyers
If you're shopping for an airplane or helicopter, weight and balance paperwork deserves the same attention as engine logs and damage history. Buyers often focus on paint, avionics, and airframe condition first. Those matter, but the records behind the loading data tell you whether the aircraft has been documented carefully over time.
That's especially important after modifications or major repairs. A neat, current weight and balance history suggests disciplined maintenance. A messy one can mean somebody changed the aircraft without carrying the paperwork through properly.
What to look for before you buy
When reviewing records, pay attention to whether the aircraft's weight and balance history appears continuous and believable.
- Modification trail. If avionics, interiors, paint, or equipment changed, the paperwork should reflect the effect on the aircraft's records.
- Repair consistency. Major repairs should make sense alongside the aircraft's documented configuration.
- Current paperwork. The aircraft should have a usable, current set of weight and balance records rather than a stack of partial revisions.
When buying an airplane, a smart buyer should budget for a mechanic to spend around 6 hours reviewing logbooks, including verification of the aircraft's weight and balance history against modifications or major repairs, according to this discussion of safe airplane buying practices.
Why this matters for sellers too
Sellers benefit from clean records because they reduce friction during pre-buy. If the logbooks clearly support the current configuration and the weight and balance data is current, buyers spend less time chasing uncertainty.
For owners managing scanned records, revisions, and signoffs, a structured system for efficient document management can make it easier to keep aircraft paperwork organized and ready for a mechanic, broker, or buyer. That's useful for airplanes and helicopters alike, especially when a deal depends on quick answers.
Clean weight and balance paperwork doesn't just support value. It supports trust.
How to buy an airplane the safe way
The safe way to buy an aircraft is to treat paperwork review as part of the airworthiness conversation, not a clerical afterthought. If a seller can't produce a coherent record of how the airplane's current empty weight and loading data were established, pause and ask why.
That applies to helicopters too. Different aircraft types have different loading sensitivities, but the principle is the same. If you can't trust the records, you can't fully trust the numbers that pilots will use to operate the aircraft later.
Your Preflight Checklist for Perfect Weight and Balance
A good weight and balance form doesn't come from being gifted at math. It comes from routine. Once your process is consistent, the task gets faster and more reliable, and your confidence rises because it's based on proof instead of guesswork.
FAA regulations require aircraft to carry current weight and balance data on board, including the Basic Empty Weight and approved CG envelope chart, and if the calculated CG and weight do not intersect within that envelope, the aircraft is legally and physically unsafe to fly according to this FAA-aligned weight and balance explanation.
Start with the visual checklist, then compare your own flow to it.

A checklist you can actually use
- Confirm the right aircraft records. Make sure the empty-weight data belongs to that exact aircraft, not just the same model.
- Pull the POH limits. Use the correct arms, station definitions, and CG chart for that airplane.
- List every variable load. Occupants, bags, and fuel all belong on the form.
- Compute each moment carefully. Don't skip line-by-line multiplication.
- Add totals separately. Recheck both columns before doing the CG division.
- Plot the takeoff point. The math isn't complete until the chart says it is.
- Check the landing condition. Fuel burn changes the answer.
- Carry the records on board. The airplane needs current data available for flight.
For a quick visual refresher, this walkthrough is useful:
 Watch Video
You're probably holding a clipboard, looking at a fuel receipt, and trying to remember whether the baggage area arm came from the POH or the school sheet. That's a normal place to...
Open the dedicated video pageThe habit that separates careful pilots from lucky ones
Students sometimes ask when weight and balance gets easier. It gets easier when you stop treating it like a school problem and start treating it like part of aircraft control. Every row on the form answers a handling question before the airplane leaves the ground.
That's the point to carry into every solo, every rental checkout, every cross-country, and every future aircraft purchase or sale. The form isn't there to slow you down. It's there to keep the airplane predictable.
If you want hands-on help turning weight and balance from a confusing worksheet into a confident preflight habit, DuBois Aviation offers one-on-one flight instruction and real-world training that helps pilots connect the numbers on the form to what the airplane does in the air.


