
You're on final for Runway 26L at Chino. The wind is pushing from the north, the centerline is starting to slide away under the nose, and if you leave the airplane in a simple crab too long, you know what happens next. You arrive over the runway still drifting, still misaligned, and now you're out of time.
That's the moment when side slip landing technique stops being a checkride talking point and becomes real flying.
At KCNO, you don't get to learn crosswind work in a vacuum. You're in a busy Class D environment, talking to tower, spacing with other traffic, and often dealing with the kind of afternoon wind that makes students work for every landing. That's a good thing. If you can learn to manage crosswinds here in a Cessna 150 or Piper Cherokee, then you're building habits that matter later when you move into something slicker like a Mooney, or when you start thinking seriously about aircraft ownership and transition training.
Why Every Pilot Must Master the Side Slip
A student on a calm morning can get away with a lot. A student on a windy afternoon at Chino can't.
On final, the side slip is what lets you keep the airplane tracking straight down the runway while also keeping the nose aligned with it. Those are two different jobs. In a crosswind, one control input handles drift, and another handles alignment. If you don't separate those jobs, the runway will teach you why that matters.

Why this matters at Chino
KCNO is a strong place to learn because you're not only managing the airplane. You're also managing pace. Tower instructions, other traffic, and runway spacing add pressure. That pressure exposes weak habits fast.
Crosswind proficiency isn't optional from a safety standpoint. Adverse wind conditions are a factor in 33% of approach-and-landing accidents, and crosswinds combined with runway condition contribute to nearly 70% of runway excursions, according to SKYbrary's crosswind landing research summary.
If you're still learning how to think about the wind before you ever turn final, it helps to get comfortable with calculating crosswind component instead of guessing from the windsock and hoping your estimate is close enough.
Practical rule: If the airplane isn't both tracking straight and pointed straight, you do not yet have the landing under control.
The maneuver does two jobs
Most students first meet the side slip as a crosswind landing tool, and that's correct. But it also teaches something broader about airplane control. You're learning how to put the airplane in an intentionally uncoordinated attitude for a reason, then manage it precisely.
That matters in two common situations:
- Crosswind landing control: You stop drift with bank into the wind and use opposite rudder to align the nose with the runway.
- Excess altitude management: In other contexts, a slip can increase drag and help you come down without accelerating.
Those are not the same use case, and students sometimes blur them together. In the landing pattern, the point is not “slip more because I'm high.” The point is to arrive aligned, stable, and ready to touch down without side loading the airplane.
What mastery actually looks like
Mastery doesn't mean every crosswind landing looks dramatic. Most good side slip landings look quiet from the outside. The corrections are small, they're continuous, and they don't stop in the flare.
What works is disciplined control. What does not work is treating the side slip like a last-second fix after carrying a crab all the way to touchdown.
Understanding the Control Inputs for a Stable Slip
The side slip feels strange at first because you're crossing the controls on purpose. Students spend a lot of early training trying to stay coordinated, then suddenly we ask them to bank one way and use rudder the other way. That's why the maneuver needs to be understood, not memorized.
The FAA defines a sideslip as a maneuver where the pilot lowers a wing and applies enough opposite rudder to prevent a turn, keeping the airplane's longitudinal axis parallel to the original flightpath while it moves sideways toward the low wing, as described in the FAA Airplane Flying Handbook.

Aileron controls drift
Start with the part students usually grasp first. If the wind is pushing you sideways, you bank into the wind. That bank creates the sideways correction that stops the drift.
The key point is that bank angle drives the amount of slip. More bank creates more sideways movement. As the bank increases, you'll need more opposite rudder to keep the nose from turning.
In the airplane, this feels less abstract than it sounds. If the airplane is drifting left of centerline, the correction isn't “more rudder.” It starts with bank into the wind. Rudder comes next for alignment.
Rudder controls runway alignment
Once you bank into the wind, the airplane wants to turn in that direction. That's where opposite rudder comes in. Its job is to stop the turn and keep the fuselage aligned with the runway.
Think of it this way:
- Aileron answers “Where is the airplane moving?”
- Rudder answers “Where is the nose pointing?”
Students often over-focus on one and neglect the other. If you use only rudder, you may point at the centerline while still drifting. If you use only bank, you may stop the drift but arrive yawed across the runway. Neither is acceptable at touchdown.
A stable side slip is not a frozen control position. It is a live balance between drift correction and directional control.
Elevator and power keep the approach normal
The third part gets ignored too often. In a side slip, you still need to fly a normal approach. Pitch and power still matter.
Use elevator to hold the correct approach attitude and airspeed. If the slip increases drag and sink, don't act surprised. That's part of the maneuver. Manage it with the same discipline you'd use on any other approach.
A common student mistake is to get so busy with aileron and rudder that airspeed starts to decay. Another is to chase glidepath with big pitch changes instead of making measured power corrections. In a trainer, you might get away with that. In a heavier or slicker airplane, it gets ugly faster.
The control picture in plain language
If you want the simplest mental model, use this one:
- Bank into the wind to stop the sideways drift.
- Add opposite rudder so the nose stays aligned with the runway.
- Hold pitch and power so the approach remains stable.
That's it. Not easy, but simple.
The FAA also notes a practical limit that matters in real airplanes. In many light airplanes, you reach the useful slip limit when full rudder is required before the ailerons can increase bank any further. That's a useful reminder that control authority is finite. Students need to learn where the airplane's real margin is, not where they wish it was.
Executing a Side Slip Landing from Approach to Touchdown
The best side slip landing starts before the flare. If you wait until the airplane is over the numbers and then try to invent a crosswind correction, you're behind the airplane.
Get established on final. Know where the wind is coming from. Decide early whether you'll stay in a slip on short final or carry a crab longer and transition before touchdown. Both can be valid, but whichever you choose, the airplane must arrive aligned with the runway.

On final at KCNO
On a busy day at Chino, don't let the radio distract you from stabilizing early. If tower gives you a landing clearance late or asks for a short approach, that doesn't change the physics. You still need a stable airplane.
A practical sequence looks like this:
- Establish final approach on speed and on glidepath.
- Correct for drift with bank into the wind.
- Align the fuselage with opposite rudder so the nose stays parallel to the centerline.
- Keep adjusting as the wind changes closer to the surface.
If you want a broader comparison of when pilots use crab, de-crab, or slip, review these crosswind landing techniques before your next lesson.
The flare is where students give away the landing
The side slip landing is won or lost in the transition from short final to touchdown.
A practical side slip sequence is to maintain runway alignment, bank into the wind, and apply opposite rudder to prevent the nose from yawing into the turn. In the flare, keep the upwind wing down and enough opposite rudder to hold the fuselage parallel to the centerline. The touchdown sequence in a tricycle-gear airplane should be upwind main first, then downwind main, then nosewheel, as outlined in this side slip landing walkthrough from MzeroA.
Students often do the hard part correctly on short final, then relax the upwind aileron in the flare because they're shifting attention to the runway. That's the mistake. The controls don't get neutralized just because you're close to the ground.
If you lower the upwind wing on short final, keep it there through touchdown. The wind does not stop just because you started the flare.
A common mistake during the flare is failing to maintain the upwind-wing-down input. That lets the aircraft drift downwind while still in a crab, which leads to a misaligned touchdown. That's one of the most common errors I see in student training.
What the touchdown should feel like
In a proper side slip landing, the airplane should feel like it is arriving straight, not skidding. The upwind main touches first because that wing is lowered. Then the downwind main settles. Then the nosewheel comes down when you're ready, not because you forced it.
That touchdown order matters because it confirms the airplane was aligned and supported correctly. A flat touchdown with visible drift is not just sloppy. It creates unnecessary side load on the landing gear.
Here's a useful visual reference before you practice it in the airplane.
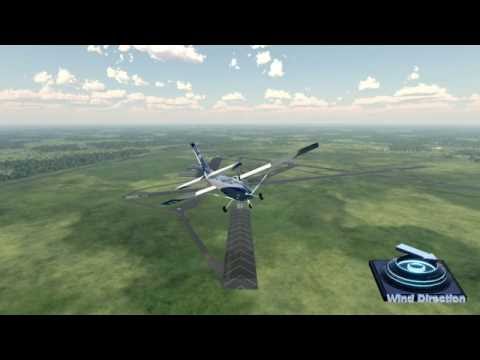 Watch Video
You turn final, glance at the runway, and the picture isn't right. The centerline is there. The aiming point is there. But the airplane feels like it's arriving from above the whole...
Open the dedicated video pageWhen to go around
There's no prize for salvaging a poor setup.
Go around if any of these show up late on final:
- Unstable airspeed: You're chasing speed with large pitch changes.
- Excess drift: You can't hold centerline without aggressive, inconsistent corrections.
- Poor alignment: The nose still isn't parallel to the runway as touchdown approaches.
- Control margin concerns: You're running out of rudder or the airplane no longer feels settled.
That judgment matters more than forcing one more landing attempt.
Common Mistakes and Safe Practice Drills
Students often assume side slip landings are hard because the maneuver is advanced. Usually, they're hard because the student is trying to fix everything at once in the flare. That's not an advanced-airplane problem. It's a training sequence problem.
Build the control feel away from the runway first. Then bring it into the pattern.

Four errors I see repeatedly
Some mistakes show up in almost every new side slip student. The correction is usually straightforward once the student can identify the error early.
- Too little rudder: The student banks into the wind but leaves the nose yawed. Result: the airplane tracks better but touches down misaligned.
- Wings level in the flare: The student had the slip, then neutralized aileron at the worst time. Result: drift returns just before touchdown.
- Airspeed decay: Attention shifts to alignment, and pitch control gets sloppy. Result: unstable sink and a poor flare.
- Late transition from crab: The student waits too long, then rushes the control change near the runway. Result: overcorrection or indecision.
A better way to practice
Don't start by trying to make every windy landing perfect. Practice pieces of the maneuver where the workload is lower.
A productive lesson sequence often looks like this:
- At altitude, establish a heading. Bank slightly and add opposite rudder until the nose stays on heading.
- Look outside and feel the airplane. Notice the crossed-control picture and the change in drag.
- Recover smoothly. Roll wings level and relax rudder together. Don't snap out of it.
- Then take that feel to final approach with a CFI controlling the training tempo.
That altitude work matters because it removes runway pressure. You can learn what the controls are doing before the ground demands precision.
Simulator work that actually helps
A simulator won't perfectly reproduce the seat-of-the-pants feel of a slip, but it is still useful if you use it for decision-making and sight picture.
Focus on these tasks:
- Runway alignment drills: Practice keeping the longitudinal axis parallel to centerline.
- Crosswind scenario changes: Change wind direction or strength late in the approach and decide whether to continue, de-crab, or go around.
- Flare discipline: Practice holding aileron into the wind all the way through touchdown.
- Radio plus flying workload: At a towered airport, task saturation matters. Rehearse that.
What doesn't help is treating the simulator like a video game and chasing dramatic control movements. Small corrections are the whole point.
In gusty or changing crosswinds, a strong slip can increase drag and sink rate, potentially reducing control margins at low speed. That's when a pilot needs to know whether to stay with the slip or transition to a crab-and-decrab technique, as discussed in this crosswind technique discussion.
Know when the slip is no longer the right answer
Many beginner articles stop too early. They teach the side slip as if it is always the answer.
It isn't.
In gusty or shifting conditions, the required slip can increase as airspeed decreases in the flare. If the airplane starts to feel draggy, sink increases, or the control margin is getting thin, don't keep forcing a stronger slip just because that was the original plan. Use judgment. Sometimes the better choice is to carry a crab longer, transition later, or go around and reset.
That decision-making piece matters even more at a busy field like KCNO, where wind can vary across the pattern and students are tempted to keep a bad approach going because traffic is behind them. Ignore that pressure. Fly the airplane first.
Adapting the Side Slip for Different Aircraft
A Cessna 150, a Piper Cherokee, and a Mooney M20B do not ask for the same timing or the same precision, even when the crosswind is the same. The basic side slip landing idea carries over. The handling does not.
The pilot who learns that early transitions more safely between aircraft.
Trainers versus faster airplanes
In a basic trainer, the side slip is usually more forgiving. The airplane slows readily, sight picture changes are easier to read, and the consequences of carrying a little extra drag are smaller. That's one reason students learn the maneuver there first.
Move into a Mooney and the energy picture tightens up. The airplane won't forgive sloppy speed control the same way. If you arrive fast, the landing stretches. If you increase drag with a stronger slip without planning for it, the sink rate can surprise you. You need cleaner setup and earlier decisions.
Bank angle at touchdown matters more than many students realize
One of the least explained parts of side slip landing technique is how much bank is acceptable at touchdown. The answer depends on the airplane.
A critical issue is that acceptable bank angle varies by aircraft, and long-wing aircraft have more wingtip-strike risk, which is why pilots must modify technique and minimize bank near touchdown when needed, as summarized in this overview of slip considerations by aircraft type).
That's also why pilots transitioning into unfamiliar aircraft should review handling limits carefully and understand how speed, loading, and control response change near the runway. If you're also working on structural-speed awareness during transition training, maneuvering speed fundamentals belong in the same conversation.
Side Slip Considerations by Aircraft Type
| Aircraft Type | Key Characteristic | Pilot Consideration |
|---|---|---|
| Cessna 150 | Forgiving trainer handling | Good platform for learning crossed-control timing and centerline discipline |
| Piper Cherokee | Stable training platform with familiar tricycle-gear touchdown cues | Maintain the slip into the flare and avoid relaxing aileron early |
| Mooney M20B | Slicker airframe and tighter energy management | Stabilize earlier and make smaller, more deliberate corrections |
| Long-wing aircraft or gliders | Higher wingtip-strike sensitivity | Minimize excessive bank near touchdown and respect geometry limits |
| Tailwheel aircraft | Different ground handling and directional sensitivity | Alignment discipline is even more critical before wheels touch |
Fixed-wing habits and helicopter thinking
Helicopters are not doing “side slip landings” in the fixed-wing sense, but the transition from airplane training to rotorcraft still teaches a useful lesson. Drift control and alignment are still separate problems. You still need to manage lateral movement and heading independently, just with different controls and a different aerodynamic model.
That matters for pilots who train in both airplanes and helicopters. The common thread is not the exact maneuver. It is disciplined control of drift, alignment, and touchdown attitude.
How Landing Skills Inform Buying Your First Aircraft
A lot of pilots shop for an airplane based on speed, paint, avionics, or useful load. Those matter. But landing behavior matters just as much, especially if you're moving out of the training fleet and into your own aircraft.
A pilot who understands side slip landing technique is in a better position to buy an airplane safely because they know what to evaluate beyond the brochure.
What to look for on a test flight
A test flight should answer more than “Does it run well?” It should reveal how the airplane behaves when precision matters.
Pay attention to questions like these:
- How does it feel in the pattern? Some airplanes settle predictably. Others need more disciplined energy control.
- How responsive is the rudder near touchdown? A side slip depends on usable directional authority.
- Does the airplane encourage good habits or punish lazy ones quickly? That matters in ownership.
- Is this airplane a logical next step from your current experience level? Many purchases go wrong because the airplane outpaces the pilot's real proficiency.
A Cherokee-to-Mooney move is a good example. On paper, it may look like a normal upgrade. In practice, the pilot needs to be honest about whether their landing discipline is ready for a more performance-sensitive airframe.
Buy the airplane you can operate well
That doesn't mean only buy the simplest airplane available. It means buy the airplane you can transition into with margin.
The safe way to buy an airplane usually includes:
- A thorough pre-purchase inspection by a mechanic who knows the type
- A realistic review of your mission instead of shopping purely on aspiration
- Insurance and transition training planning before the purchase closes
- An honest look at your current landing and crosswind proficiency
The same thinking applies to helicopters. A buyer moving into rotorcraft ownership needs to judge handling qualities, training demands, and operational environment with the same humility.
Ownership starts with transition training
Many buyers get this backward. They think training starts after the purchase because now they “own the airplane.”
Safer pilots reverse that thinking. They line up transition instruction as part of the purchase decision itself. If the airplane requires sharper energy management, more exact touchdown technique, or stronger crosswind discipline than the trainer they came from, that's not a surprise. That's the point.
For pilots training locally, DuBois Aviation at Chino offers one-on-one airplane and helicopter instruction, aircraft rental, and simulator access in the same busy towered environment where these transition skills matter. That makes it a practical place to evaluate readiness before stepping into ownership.
If you can't land the airplane consistently in the kinds of winds you're likely to face, you don't yet fully own the decision. The paperwork may be done. The skill part still isn't.
If you want to sharpen your side slip landing, build crosswind confidence at a busy towered airport, or prepare for a safe transition into your first aircraft, DuBois Aviation is a practical next step. Train in Cherokees, a Cessna 150, a Mooney, or helicopters at KCNO with one-on-one instruction focused on real handling skills, not just checkride minimums.


